How to Remove Stuc Pen Feed
 There are many reasons, some subjective and others objective, as to why Pelikan pens are as popular and lasting as they are. Undoubtedly, one feature that clearly endears them to novices and enthusiasts alike is the fact that the nibs are interchangeable and, by and large, have been so since the inception of the model 100. The nib is the business end of the pen and if it is not performing as expected or becomes damaged, even the most beautiful fountain pen in the world is rendered useless. I previously discussed these nibs and their ability to be easily exchanged (amongst other attributes) in my post, The Evolution of the Collar, Feed, & Nib. What's more, not only are the nibs interchangeable but that this can be accomplished by the end-user and does not require a sometimes lengthy trip back to the manufacturer or a certified dealer, certainly a boon to the user. These facts combine to allow one pen to take on a significant amount of character as Pelikan's catalogue of nibs over the years has contained a wide variety of expressive options, not to mention the variety of custom grinds available from third parties today. Even if you only own one nib, the ability to change nibs can come in quite handy in the event of accidental damage (why is it that all uncapped pens insist on landing nib side down?). I could continue to expound on the virtues of the interchangeable nib but that is not our purpose today. Today, I want to review for you exactly how to safely remove and replace a nib because this can be an area of confusion for many and some forethought should be employed prior to attempting. Rest assured, however, that this is a safe procedure which can be carried out without much difficulty or skill.
What You'll Need:
- No special tools required
Procedure:
To Remove
- Unscrew and remove the cap from the pen thereby exposing the nib and feed.
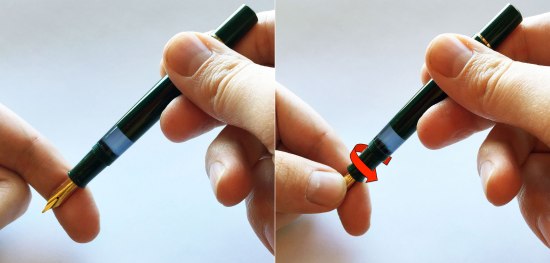
- Placed the feed of the pen in the crook of the index finger of your non-dominant hand with the tip of the nib pointing towards the ground.
- Take the thumb of that same hand and apply pressure to the top of the nib, thereby preventing the nib from shifting on the feed.
- Now, with your dominant hand, turn the BARREL counterclockwise to unscrew the nib from the section (the nib itself should never move in your hand).
To Replace
- To replace the nib or install a new nib, repeat the above steps, only this time turning the barrel clockwise.
- Seat the nib firmly and securely in the section but there is no need to apply excessive torque. You want the feed snug but not over-tightened.
Discussion:
The procedure described above will work for any of Pelikan's fountain pens that incorporate a removable nib with a threaded collar (note that not all do). This would include but not be limited to the 100, 100N, 101N, 120, 140, Ibis, 400, 400N, 400NN, all Souverän, and all Tradition series pens. Care should be taken to remove the nib in a safe environment and precautions put in place to minimize potential damage from dropping the nib. The above procedure can be performed in a pen filled with ink, what I term a "hot-swap" of the nib. The procedure is the same as described above except that the nib tip should be pointing up towards the sky or else you are liable to spill the ink from the reservoir. Once the new nib is installed, I gently advance the piston until a drop of ink comes out of the feed in order to prime the feed and nib for writing before retracting the piston back to its resting position. While it is true that no special tools are required for the removal of the nib, I will demonstrate in one of the videos below how to remove a nib should you have one of Pelikan's nib removal tools on hand (sold with the MC110 and MC120 sets). While convenient, this is certainly not necessary nor is it worth searching out one for this sole purpose.

Pelikan's nib removal tool sold with MC110 and MC120 calligraphy sets
Special Considerations:
- All nibs, both modern and vintage, can become stuck in the section. This is usually the result of an accumulation of dried ink which acts like cement or glue. The cure for this is repeated soaking of the nib, feed, and section as well as flushing the pen in order to dissolve any ink and free the feed. If there is any significant resistance to removal during step 4, I soak the nib. If necessary, I also employ a dilute ammonia solution to help with dissolution of any old ink. Failure to do so can result in damage. With nib removal, it never pays to be hasty. I also do not favor the application of heat routinely as this too often can be done incorrectly resulting in warping of the barrel. Ultrasonic cleaners have been employed with success but I would be very cautious as damage can occur, especially to vintage pens with prolonged exposure.
- Vintage nibs from the 1950's and 1960's may have a polystyrene collar (clear plastic). Pens at risk for this would be the 400NN, 120, and 140. This collar becomes very brittle and is often found cracked. A nib/feed might twist and twist in place before pulling out leaving the collar stuck in the section. This is not uncommon on those models and needs to be handled with care. You can either attempt replacing the nib and feed into the collar but you may be prone to leaks in that scenario. In this situation, the collar most likely will need replacement. See my post on polystyrene collars for further informationregarding this unique situation.
- Vintage feeds with the longitudinal fins are made of ebonite, a type of plastic that can become brittle over time. These are very reliable feeds but are easily prone to cracking/chipping. If any significant torque is applied during removal of the nib, especially if the feed is stuck in the section, damage can occur. The fact that Pelikan had a special tool just for the removal of these nibs (now nearly impossible to find) should be very telling about their delicate nature. It is very important to soak these nibs thoroughly and exercise extra caution when removing. Rather than just the crook of my finger, I favor using a soft cloth or paper towel for added cushioning/protection but the procedure for removal is otherwise the same as described above. Due to the inherent risk of damage to the vintage ebonite, I try to refrain from removing vintage nibs unless absolutely necessary.

Left: Modern feed with horizontal fins. Right: Vintage feed with longitudinal fins
- If I do have the nib out of a pen for any reason, I favor applying the smallest amount of pure silicone paste to the threads of the collar to prevent the nib assembly from ever seizing in the section should removal again become necessary in the future. I see no downside to this practice provided PURE silicone paste is used. Other products may contain petroleum which can damage plastics over time. This is completely optional and only a matter of preference.
Removal of a Modern Pelikan Nib
Removal of a Modern Pelikan Nib Using a Nib Removal Tool
Removal of a Vintage Pelikan Nib
Source: https://thepelikansperch.com/2014/11/22/changing-pelikan-nib/
0 Response to "How to Remove Stuc Pen Feed"
Postar um comentário